Any document in Microsoft Word can include mail merge fields. These fields allow a document to reference a data source which can include one or more records of information. Using a mail merge, this information can be placed into the document such that it varies for each record.
DB Precision uses mail merges as a way of extracting data and calculated items from the system and then displaying that information into a Word Document. To do this, DB Precision writes information to a comma delimited file (.csv), opens a Microsoft Word document that includes mail merge fields, and then completes the mail merge.
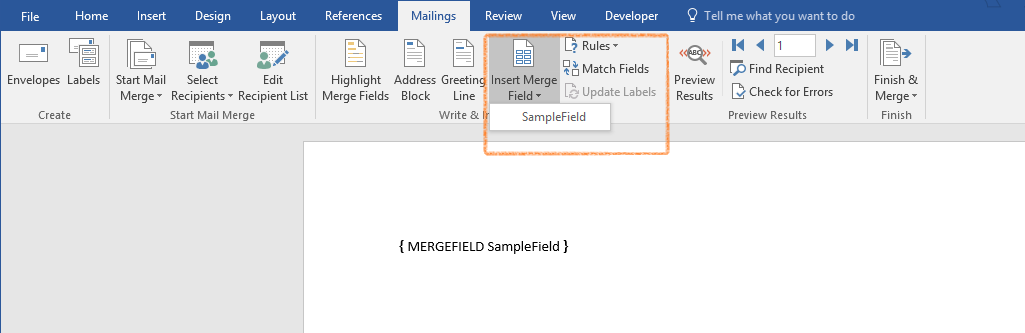
For Word documents opened by DB Precision and linked to a data source, you can insert mail merge fields as follows:
- Inserting a Merge Field: highlight the area in which you would like to insert a merge field. At the top of the screen, go to Mailings - Insert Merge Field. Select the item from the drop down list that you would like to insert.
- Displaying Data for Inserted Fields: once a field has been inserted, the field will display the data name in between double brackets. If you select Mailings - Preview Results, you can toggle between field name and the actual data from the data source.
- Displaying Merge Fields: in most cases, the display of the merged data is fine as-is. However, if you need to modify the format, right-click the merge field and then select Toggle Field Codes from the resulting menu.
- Inserting Field Switches: to insert field switches, you will need to insert the switches after the name as such: {MERGEFIELD fieldname\*CHARFORMAT}
- Previewing Results: to view the impact of any switch changes, press the Preview Results button
The following switches are useful for exported files from DBP
- \*CHARFORMAT: by inserting this switch into a merge field, the format of the field (font color, bold, italics, etc.) will come from the format specified in the Word document (rather than from the data source).
- \*UPPER: converts all text in the merged data to upper case.
- \@ "MMMM d, yyyy": will display a date spelled out (ex. January 1, 2014) even if the data stored is numeric (ex. 1/1/2014). Make sure to include the quotes as shown.
- \@ "yyyy": will display only the year of a given date. Make sure to include the quotes as shown.
- \# "$#,##0.00": displays a numeric amount as currency. Make sure to include the quotes as shown.
- \# "#,##0.00": same as above but without the dollar sign.
